

Forms
Swebsy recognizes valid HTML forms and their fields as editable components: form, fieldset, legend, label, input, textarea, select, option, checkbox, radio, and button each have their own settings.
A new form is collected by Swebsy out of the box. There is no endpoint to sign up for, no key to paste, and nothing to configure — the submission is emailed to you and a copy is saved under Settings → Forms.
From there you choose where each form goes: your verified account email, a URL of your own, or both.
Swebsy Forms is paid: it comes with Starter, Pro, and the Pro trial. A form on a site published on the Free plan does not accept submissions — upgrade or start the trial to collect them.
There is no Forms category in the Components panel, so you do not drag a blank form onto the canvas. A form reaches your page one of three ways:
- A ready-made block — in the Blocks tab, search for
formor open the Form group under By section. - A template — several templates ship a contact form already laid out.
- Imported HTML or the AI builder — pasted or generated form markup is parsed into the same editable components.
Select the form
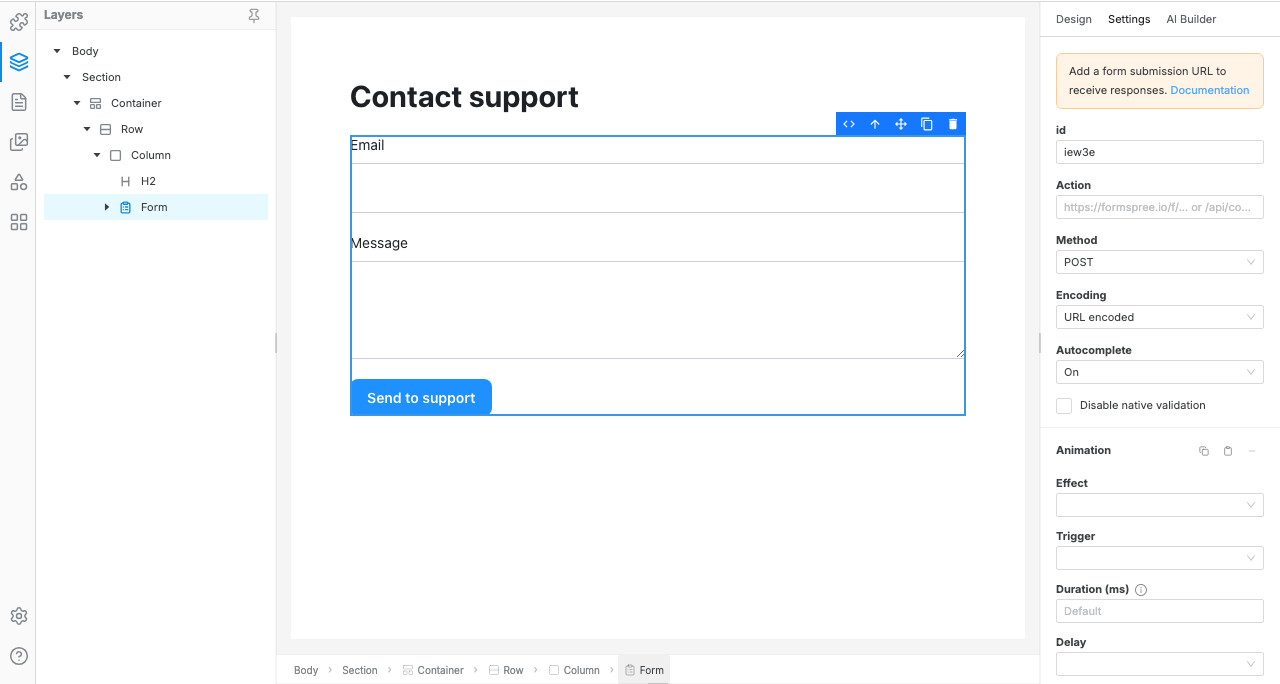
Section titled “Select the form”A form has no padding or background of its own, so clicking it on the canvas almost always selects the column around it instead. Its settings live on the form itself, so reach it one of these two ways:
- Layers panel (recommended) — open Layers in the left sidebar, expand the section, and click the Form row.
- From one of its fields — click any input, label, or the submit button on the canvas, then use the Form settings → link at the top of the Settings tab.
Collect with Swebsy
Section titled “Collect with Swebsy”- Select the form in the Layers panel, as described above.
Open the right sidebar’s Settings tab and leave Submissions set to Collect with Swebsy.
Give it a Form name —
Contact,Quote request,Newsletter. The name groups submissions and selects the delivery settings, so the same form on several pages should keep one name.Choose what happens After submit: show a message, go to one of your pages, or go to a URL.
- Publish with Swebsy Hosting, then submit once from the live site.
Your plan sets how many submissions a month are included — 500 on Starter, 5,000 on Pro, 50 during the trial, none on Free. The Forms panel shows the month’s usage.
Choose where submissions go
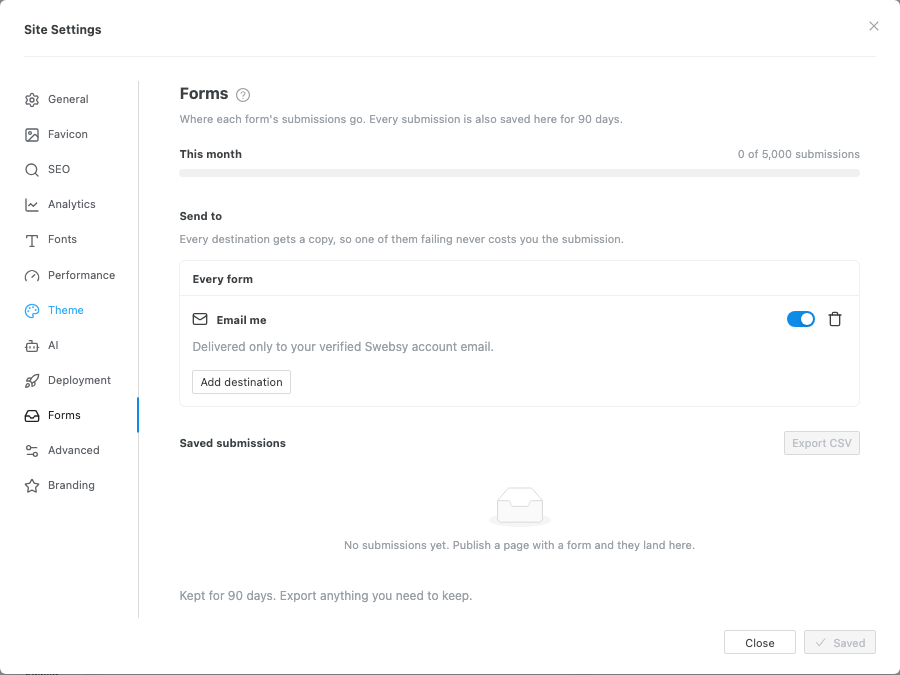
Section titled “Choose where submissions go”Settings → Forms lists every form on your site. Each one has a Send to list, and every destination on it gets a copy — so one of them failing never costs you the submission.
| Destination | What it does |
|---|---|
| Email me | Sends the submission only to your verified Swebsy account email. Replying goes to the visitor’s submitted email. |
| Send to a URL | POSTs the submission as JSON to any HTTPS endpoint — Zapier, Make, n8n, your CRM, your ticketing system, or your own server. |
Set them once under Every form, or give an individual form its own list with Set up separately. Send a test delivers a sample submission through the real path, so you can confirm the wiring before you launch — it is not counted against your monthly limit and nothing is saved.
If a destination fails, Swebsy retries it three times immediately and again the next day, emails you once so you know, and marks the submission Not delivered with a Retry button. The submission itself is always saved first, so a broken endpoint costs you a delay, not a lead.
When a form gets busy
Section titled “When a form gets busy”A submission is always taken and always saved. Delivery is the only thing with a limit, and it never fails quietly:
- More than 20 submissions in an hour — you get one summary email for the hour instead of one email each. Every submission is still in the panel, and each one says it went out in that summary.
- Past your monthly allowance — delivery continues, and you get one email saying you have reached the limit.
- Past twice your monthly allowance, or past a day’s worth in one day — new submissions are marked Held. They are saved and readable as usual, and Retry sends any of them. Delivery resumes the next day, or as soon as you upgrade.
A day’s worth is your whole monthly allowance for a site on a
*.swebsy.site address, and a tenth of it for a site on your own domain with
no Turnstile keys of its own — an unprotected form is one anyone can post to.
Adding your own keys raises it.
Saved submissions
Section titled “Saved submissions”Every submission is kept for 90 days under Settings → Forms, where you can read it, mark it read, export the lot as CSV, and delete what you don’t need. This is a safety net rather than an inbox — export anything you need to keep longer.
Post to your own URL instead
Section titled “Post to your own URL instead”Set Submissions to Post to my own URL and enter the receiving address.
Use an absolute HTTPS URL, or an explicit same-origin path such as
/api/contact. Method and Encoding live under Advanced; set them to
whatever the receiver expects.
Swebsy neither receives nor stores these submissions, so none of the delivery, retry or backup behaviour above applies. The status above the form settings tells you where it stands:
- Collected by Swebsy — delivered to your destinations, saved for 90 days.
- Posts to your own HTTPS URL — you handle it from there.
- Action required — nothing receives this form; submissions stay blocked.
- Invalid — the value is a placeholder, a bare domain, or an insecure production HTTP URL.
Local http://localhost, http://127.0.0.1, and http://[::1] endpoints are
accepted for development. Published external endpoints should use HTTPS. Never
place API secrets in the URL or page source.
Configure fields
Section titled “Configure fields”Select an input, textarea, checkbox, radio button, or select control and open Settings. Every submitted control needs a Name. The browser sends that name as the key and the visitor’s entry as its value. Radio buttons in the same group intentionally share one Name.
For example, an email input named email submits a value such as
[email protected], and that is the column you will see in your inbox. A
field without a Name may look correct but is not included in the request.
Use the other field settings as needed:
- Type controls native input behavior, such as email or telephone input.
- Required enables browser validation before submission.
- Autocomplete helps browsers fill familiar fields.
- Disabled prevents a field from being edited or submitted.
- Read only keeps a value visible and submit-capable without allowing edits.
Labels should point to the matching field ID so the form remains accessible.
File uploads are not supported by Swebsy Forms yet — a form that attaches a file needs your own URL.
Spam protection
Section titled “Spam protection”Swebsy Forms use layered abuse controls:
- Every form carries a hidden decoy field that visitors never see. A bot that fills it in gets a normal-looking success page, and the submission is held as Blocked for 7 days rather than delivered — so a false positive is still there to be found.
- Submissions are accepted only from your own site’s address, so no other website can post a form to yours.
- Cloudflare Turnstile supplies a short-lived challenge token bound to the submission action and the published hostname.
- Repeated submissions are rate limited per visitor, per site, and per day. Control-plane test and retry actions have their own hourly and daily limits.
Preview and publishing behavior
Section titled “Preview and publishing behavior”- Design mode: submissions are blocked so clicking the form cannot navigate away from the editor. Use Preview to test the layout.
- Preview, collected by Swebsy: the form reports that it is in test mode. The Studio is not your published address, so there is nothing to deliver to; use Send a test in Settings → Forms, or submit from the live site.
- Preview, your own URL: Swebsy sends a real browser submission to the configured endpoint and opens the response in a new tab, so the canvas keeps showing the site you are editing. Use test data.
- Published on Swebsy Hosting: the form posts in the background and replaces itself with your success message, or follows your redirect.
- Unpublished: the form stops accepting submissions along with the rest of the site. Publish again and it resumes; anything already collected is untouched.
- Exported elsewhere: your own URL uses normal HTML submission behavior. A form collected by Swebsy has nothing to post to.
Test before publishing
Section titled “Test before publishing”- Give every submitted field a Name.
- Publish the site.
- Submit once from the live domain.
- Confirm the submission appears under Settings → Forms and in your email.
- Check the success message or redirect, and try an invalid submission.
Nothing arrives after publishing outside Swebsy Hosting — Swebsy only collects submissions on Swebsy Hosting. Either publish there, or point the form at your own URL.
Submitted data is missing — check that each field has a Name value. Fields without names are not included in normal form submissions.
“Test mode” appears in Preview — that is expected. Swebsy Forms deliver from your published address, not from the editor.
Browser validation blocks submission — required fields must be filled before submit. Enable Disable native validation on the form only when the receiving service performs equivalent validation.
The live site returns 404 after submit — a same-origin URL such as
/api/contact requires that route to exist on the deployed host. Static HTML
alone does not create it.
You stopped getting emails — check that the Email me destination is still switched on for that form, and whether the month’s submission limit has been reached.
A webhook shows “Not delivered” — hover the tag for the reason. A 4xx means your endpoint rejected the payload and Swebsy will not retry it; a 5xx or a timeout is retried automatically. Fix the endpoint, then press Retry.