

AI coding agent
If you already use a coding agent — Claude Code, Codex, Cursor, Windsurf, or any other agent that supports MCP — you can let it drive your open Swebsy Studio tab directly. This is the recommended way to build with AI without adding a separate provider API key to Swebsy. Your coding agent’s own plan, usage limits, and privacy policy still apply.
How it works: your coding agent talks MCP to a small local bridge (@swebsy/mcp), which relays commands to the open Studio tab over a WebSocket on 127.0.0.1 (default port 37373). The relay is local-only, and Studio removes API keys, deploy tokens, and chat history from agent-visible data before it crosses the bridge.
1. Add the bridge to your coding agent
Section titled “1. Add the bridge to your coding agent”Run one command. It registers @swebsy/mcp with every supported agent it finds on your machine (Claude Code, Codex, Cursor, Windsurf, VS Code):
npx -y @swebsy/mcp setupIt never changes an existing swebsy entry, never rewrites a config file it can’t read, and reports the result for each agent. Running it again changes nothing.
To register it by hand instead:
Claude Code
claude mcp add swebsy -- npx -y @swebsy/mcpCodex
codex mcp add swebsy -- npx -y @swebsy/mcpCursor
Add to ~/.cursor/mcp.json (or .cursor/mcp.json inside a project):
{ "mcpServers": { "swebsy": { "command": "npx", "args": ["-y", "@swebsy/mcp"] } }}GitHub Copilot (VS Code)
code --add-mcp '{"name":"swebsy","command":"npx","args":["-y","@swebsy/mcp"]}'Windsurf
Add to ~/.codeium/windsurf/mcp_config.json:
{ "mcpServers": { "swebsy": { "command": "npx", "args": ["-y", "@swebsy/mcp"] } }}Other MCP agents
Any agent that can run MCP stdio servers works — register npx -y @swebsy/mcp as a server named swebsy in its MCP configuration.
To use a different port, set the SWEBSY_AGENT_PORT environment variable on the server entry. Set SWEBSY_AGENT_DIR to choose where screenshots and exports are written; without it, the bridge uses .swebsy-agent in the nearest pnpm workspace or its current working directory. To point the pairing link at a non-default Studio origin (local dev or self-host), set SWEBSY_APP_URL (defaults to https://studio.swebsy.com). swebsy_start_pairing opens the pairing link in your default browser automatically; set SWEBSY_NO_OPEN=1 to disable that and just receive the link.
2. Pair Swebsy with your agent
Section titled “2. Pair Swebsy with your agent”The fastest way is a pairing link — your agent generates it, it opens in your browser automatically, done.
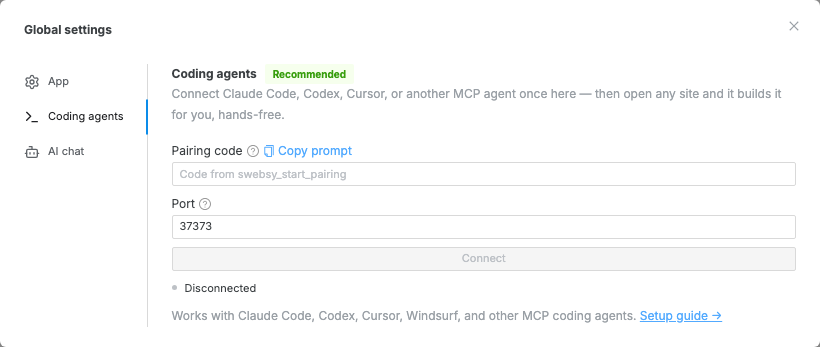
In Swebsy, open the Global settings gear and go to the Coding agents tab (also reachable from Set up coding agent in the AI Builder panel). Step 1 repeats the install snippet above — pick your agent’s tab and copy it if you haven’t run it yet. Then copy the step 2 prompt.
Paste that prompt into your coding agent. It runs
swebsy_start_pairing, which opens a single-use pairing link (a?swebsy_pair=…URL) in your default browser and also returns it in the reply.Studio connects automatically — no form to fill in. The one-time code is stripped from the address bar once it’s used. If the link opened in a browser where Swebsy isn’t running, open the returned link in the right one instead.
The pairing link expires after ten minutes and can be used only once. You pair
once per browser: Studio remembers the session, and so does the bridge (in
~/.swebsy), so it reconnects after a reload, a lost connection, or the bridge
restarting.
After that you don’t need to pair again. If no Studio tab is connected when your agent calls a tool, the bridge opens Studio and reconnects it by itself, then runs the tool. If a Swebsy tab is already open, that tab picks the session back up and the new one tells you it can be closed.
In Claude Code, the /swebsy:swebsy (MCP) prompt walks the agent through
connecting and opening a site. Other agents show MCP prompts in their own way,
if at all.
3. Create, open, and build from your agent
Section titled “3. Create, open, and build from your agent”Prompt your coding agent as usual. It can list installed templates and saved
sites directly from Home, create a blank or template-based site, open a site by
ID, and rename a site’s internal Swebsy name. Site IDs are authoritative, so
duplicate names are fine. Creating from a template preserves that template’s
name and project data; call swebsy_rename_site separately when you want a
different internal name.
Creating or opening a site starts Studio navigation. Poll swebsy_status until
editorReady is true and siteId is the expected ID before sending editing
commands. While Home is open or Studio is loading, status reports siteId: null
and editorReady: false.
Most editing tools act on the currently selected page. The agent can switch
pages with swebsy_select_page, inspect stable component paths with
swebsy_read_page, and then edit the intended target.
A typical site-management workflow
Section titled “A typical site-management workflow”You can give the agent one natural-language request, for example:
List my installed templates, create a site from the portfolio template, wait for it to open, rename it to Northwind Portfolio, and add a Contact page.
The agent should perform the workspace operations in this order:
- Run
swebsy_list_templatesand choose the template by its returnedid. - Run
swebsy_create_sitewith thattemplateIdand keep the returnedsiteId. - Poll
swebsy_statusuntil the samesiteIdis present andeditorReadyistrue. - Run
swebsy_rename_sitewith thesiteIdand new internal name. - Use the editing and inspection tools only after the editor is ready.
The same pattern applies to swebsy_open_site: list sites, select by ID, open
the site, then wait for the expected ready editor before making changes. The
bridge invalidates the previous editor while navigation is in progress, so
queued edits cannot land on the site you just left.
Creation and naming rules
Section titled “Creation and naming rules”| Action | Behavior |
|---|---|
swebsy_create_site {} |
Creates Swebsy’s standard blank project with its automatic name and default content |
swebsy_create_site { templateId } |
Imports the selected template unchanged, including its name, pages, styles, symbols, and assets |
swebsy_rename_site { siteId, name } |
Trims the name and changes only the internal name shown on Home and in the Studio topbar |
| Change the browser or search-page title | Use the site’s SEO/public title settings; renaming the internal project does not change those fields |
Creation deliberately has no name argument. Create or import first, then rename the resulting site explicitly. Copying and deleting sites are not available to agents; use the Project menu for those actions.
What workspace tools return
Section titled “What workspace tools return”swebsy_list_templatesrefreshes the installed catalog and returns template IDs, names, descriptions, tags, fonts, preview URLs, and thumbnail URLs.swebsy_create_sitereturnssiteId,name,source, optionaltemplateId, andstudioPathbefore the paired tab navigates.swebsy_list_sitesreturns sites newest-first with onlyid, internalname,status, timestamps, optionaltemplateId,pageCount, andisOpen. It does not return page content, thumbnails, assets, revisions, or settings.swebsy_open_sitereturns that site’s metadata. Opening the already active site is safe and does not reload Studio.swebsy_rename_sitereturns the updated metadata and refreshes the name on Home and in the Studio topbar.
Use multiple coding agents
Section titled “Use multiple coding agents”You can connect several coding agents to the same open Studio tab at once. For example, Claude Code and Codex can work side by side on the same project:
- Register
@swebsy/mcpin each coding agent and start both agents. - Keep every MCP server on the same
SWEBSY_AGENT_PORT(the default is 37373). The first server starts the shared local relay; the others join it automatically. - Pair the Studio tab once. You do not need a separate pairing code for each agent.
The AI Builder panel lists every connected agent, shows whether each is
Working or Idle, and tags activity with the agent that initiated it.
swebsy_status returns the same connected-agent roster.
Screenshots and exports are returned only to the agent that requested them and
are written to that MCP server’s SWEBSY_AGENT_DIR. To reduce conflicting
intent, give agents separate pages or areas of responsibility and have them
inspect current state before editing shared content.
Available tools
Section titled “Available tools”Sites and templates
Section titled “Sites and templates”| Tool | Input | What it does |
|---|---|---|
swebsy_list_templates |
None | Refresh and list installed templates with metadata, preview URLs, and thumbnail URLs |
swebsy_create_site |
Optional templateId |
Create the standard blank site or import a template unchanged, then open it in Studio |
swebsy_list_sites |
None | List saved sites newest-first as metadata only, including IDs, page counts, and open state |
swebsy_open_site |
siteId |
Validate and open a saved site by ID; does nothing disruptive when that site is already open |
swebsy_rename_site |
siteId and non-empty name |
Change only the internal Home/Studio site name, without changing SEO or the deployed-page title |
Build and edit
Section titled “Build and edit”| Tool | What it does |
|---|---|
swebsy_commit_design_direction |
Commit the site to a visual direction — type, palette, topology — and apply it. Call once before building a new site |
swebsy_replace_page_content |
Replace every top-level section on the selected page; does not create a page |
swebsy_create_page |
Create a blank page, select it by default, and return its ID and filename |
swebsy_link_page |
Point an existing navbar link, link, or button at a project page |
swebsy_add_section |
Insert a generated section at the start, end, or next to a given targetPath |
swebsy_edit_section |
Replace or patch the selection or a component path from swebsy_read_page |
swebsy_delete_section |
Remove the selection or a component path from the page (never empty it instead) |
swebsy_insert_block |
Insert a catalog block, with optional adaptations and targetPath placement |
swebsy_update_settings |
Update general, SEO, font, theme, dark-mode, and site-wide CSS settings |
swebsy_animate_page |
Apply Swebsy’s scroll-reveal system to the current page or every page |
Navigate, inspect, and reuse
Section titled “Navigate, inspect, and reuse”| Tool | What it does |
|---|---|
swebsy_status |
Report relay/tab state, internal site name, editor readiness, page, viewport, and tools |
swebsy_list_pages |
List every page with its ID, name, file name, section count, and which one is selected |
swebsy_select_page |
Select a page by ID or name |
swebsy_read_page |
Read the selected page structure and addressable paths; flags symbol mains, instances, and per-instance overrides |
swebsy_read_selection |
Read the currently selected component’s type, classes, attributes, and text |
swebsy_list_blocks |
List block IDs and labels available to swebsy_insert_block |
swebsy_get_builder_guide |
Load the component, theme-class, and builder conventions used by Swebsy |
swebsy_list_skills |
List available deep-guidance skills and their summaries |
swebsy_get_skill |
Load the full instructions for one guidance skill |
swebsy_list_symbols |
List reusable symbols, instance counts, and page counts |
swebsy_promote_to_symbol |
Turn a component path into a reusable symbol |
swebsy_add_symbol_instance |
Add a linked symbol instance at the start or end of the selected page |
Before building a repeated custom component — cards, link blocks with hover
effects, testimonials — have the agent load the symbols skill
(swebsy_get_skill). It explains how to build one symbol and repeat it with
different content per instance while the styling stays in sync, which also keeps
those sections harvestable as reusable blocks.
Connection and files
Section titled “Connection and files”| Tool | What it does |
|---|---|
swebsy_start_pairing |
Open a single-use pairing link in the browser and return it plus the fallback code and port |
swebsy_capture |
Save a page, section (targetPath), or selected-component PNG at a fixed responsive viewport |
swebsy_list_assets |
List managed assets and their whole-project usage counts |
swebsy_upload_asset |
Put a local image file into the site’s asset library and return the src to use on it |
swebsy_delete_asset |
Delete a managed asset; refuses live references unless force: true |
swebsy_export |
Write the static site and, optionally, portable project JSON and assets |
swebsy_upload_asset is how an agent gets your imagery into a site —
screenshots, logos, textures, product mockups. Give it an absolute path to a
.png, .jpg, .webp, .gif, .avif, or .svg (up to 10 MB) and it returns
the asset src to set on an image component. Without it, an image with no src
falls back to a random stock photo.
Prefer .svg for logos and other flat vector art so it stays sharp at any size.
Uploaded SVG is sanitized before it is stored — scripts, event handlers, and
references to external URLs are stripped — so a logo downloaded from the web is
safe to drop straight in. The same sanitizing applies to SVG you upload by hand
in the Studio asset manager.
Changes appear on the canvas live. Undo works as usual in the Studio tab.
Switching between agent and API key
Section titled “Switching between agent and API key”There’s no mode setting to flip — the AI Builder panel just shows whatever you’ve configured. Set up only a coding agent and it shows Agent connected; set up only an API key and it shows the chat. When both are configured, the panel shows an Agent ⇄ Chat toggle so you can switch surfaces per session. Configure either one from the Global settings gear (Coding agents or AI chat tab).
Privacy
Section titled “Privacy”- The bridge listens on
127.0.0.1only — nothing is reachable from the network. - Studio redacts secrets before anything crosses the bridge: your AI API keys, deploy tokens, and AI chat history are never sent to the agent.
- Pairing grants every connected agent permission to edit the open project. Agents can update content, SEO, fonts, branding, and themes, but cannot modify credential, deployment, analytics-script, security-header, or raw code-injection settings.
- Workspace tools can receive installed-template metadata and saved-site metadata (including internal site names, IDs, timestamps, template IDs, and page counts). Site listing does not return page content, thumbnails, assets, revisions, or settings.
- The agent can create, open, and rename local sites. Creation and rename analytics include only source/template/site IDs; internal names and site content are not included.
- The agent can receive the non-secret site content, settings, screenshots, and exports needed to complete editing requests. Your coding agent may process that data through its own service, so its privacy policy still applies.
- Pairing codes are single-use and expire after ten minutes; refresh the code with
swebsy_start_pairingany time. - The session token is stored in
~/.swebsy/agent-<port>.session, readable only by your OS user. Pairing with a new code replaces it.
not_connected from agent tools — no Studio tab connected within 20 seconds. Click your Swebsy tab (it may be asleep), or open the link in the error message, then retry. To pair from scratch, use Global settings → Coding agents (or the Pair agent button in the AI Builder panel).
tab_unresponsive — the Studio tab is connected but the browser has put it to sleep. Click the tab, then retry. See Keep the Studio tab awake above.
“Could not reach the MCP bridge” — the bridge isn’t running on that port. Check the MCP server is registered and running in your agent, and that the port in Swebsy matches SWEBSY_AGENT_PORT (default 37373).
Pairing rejected — links and codes are one-time. Ask the agent to run swebsy_start_pairing again, then open the fresh link or paste the fresh fallback code.
Only one agent appears — make sure every agent’s MCP server is running and uses the same SWEBSY_AGENT_PORT. Run swebsy_status to inspect the shared roster. Pair Studio once to the shared relay rather than generating a code for each agent.
An agent waits while another is working — this is expected. The shared relay serializes commands so only one mutation runs in Studio at a time.
“Agent connected in another tab” where you expected the chat — another Swebsy tab, not another coding agent, holds the session. Only one tab can hold it. Click Take over here in the tab you want your agent to drive.
Agent connected but the AI Builder chat is gone — that’s by design: while an agent is paired you prompt from the coding agent, not the panel. If you also have an API key set, use the panel’s Agent ⇄ Chat toggle to get the built-in chat back.